 After getting several invitations for baby showers this summer, I started looking for baby gifts in my local stores. I found plenty of adorable baby hats, but at prices ranging from $20 to $105 (for a baby hat!) I thought I could certainly make something cheaper and more memorable for my friends.
The great thing about this project is that you only need an hour and a t-shirt or two to make a great baby hat. But if you want to go wild, you can spend a little more time and make a beard for your baby hat too!
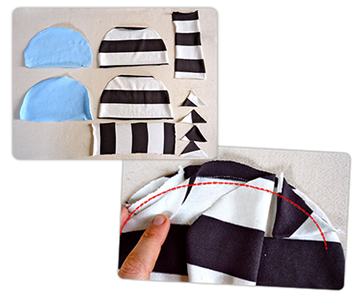 1. Cut out your pattern pieces from a t-shirt or stretch knit shirt you find at Goodwill (make sure to wash first).
2. With right sides together, sew up the sides of the ears (leaving the bottom open). Turn the ears right side out.
3. Match raw edges of ears with the hat pieces and sew along the edge (red dotted line).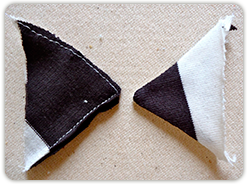 4. Sew up the short edges of the edging piece.
5. Sew lining pieces together and place inside the main hat piece so that the wrong sides match up (when you look inside the hat you should see the right side of the lining. Place the edging piece outside (matching edges and seams) with wrong side facing outward. Stich together with a zigzag stich.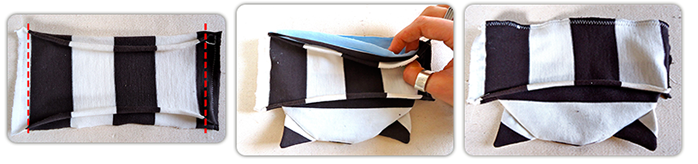 6. Next fold edging piece over the seam you just made, and pin it to the inside. Stich closed using a whipstitch.
7. Done! Now you can get creative or leave your hat as it is.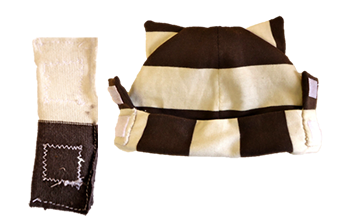 8. My friend’s husband (the one having the shower) happens to have a really long beard, and I thought it would be great to make a detachable beard for their baby’s hat (what kind of baby wouldn’t want a beard?)
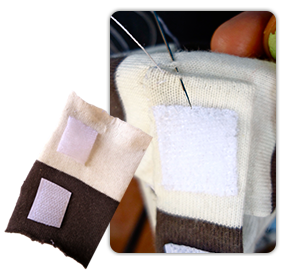 9. I thought the beard should be removable because it would not be wise to leave an unattended infant wearing it (too many chances for disaster). This is a comic piece that could be used for some funny photos, but not on a daily basis. So, I made two Velcro tabs to make for easy beard removal.
10. To make tabs, cut out 2 rectangles of fabric and sew Velcro top and bottom squares down onto it. Next fold the rectangle in half and stich sides together leaving enough of an opening to turn right side out. Use a whip stich to attach the Velcro tabs to the bottom of the hat.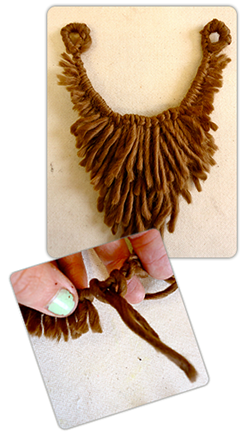 11. For the beard: I bought a skein of baby alpaca yarn to use but you could make one out of shredded t-shirts too. Take one piece of yarn (about twice the length of the bottom of your hat) and loop shorter pieces of string around it and use longer pieces as you go towards the middle of the beard.
12. Tie loops at the ends to finish off the yarn, and run a quick stich around the top to keep all the loops in place.
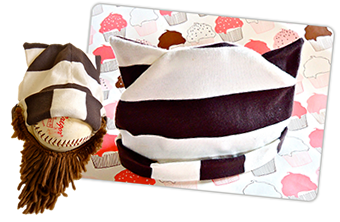
13. Now you have a removable beard to accessorize your baby hat! I didn’t have a newborn baby model handy, so I used a softball to see the effect. It was such a hit at the baby shower; imagine what fun your friends will have with this too.
Goodwill can help you make a memorable gift for your pregnant friends that is cheaper, more unique, and more fun than what you could find for them in other stores!


