
 When I was in Ghana there was a weekly bead market in the town of Koforidua. The alleys were filled with vendors selling recycled glass beads, tiny circular wooden chips, Chevrons and everything in between. The abundance and variety of color was such a delight. Since then I have kept an eye out for bright, fun beads to make chunky summer necklaces, but everything I found was out of the price range I could afford.
The other day, while collecting extra kitchen supplies to take to Goodwill, it occurred to me that many of these kitchen tools would be great for making jewelry.
You will need a few power tools to make this project easier (I used a miter saw and a drill press) but this could also be done with a handsaw. After your pieces are cut, it’s fun to assemble the jewelry with older kids.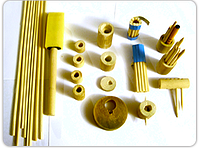 What you’ll need:
-An assortment of wooden tools (pasta strainer, spoon, salad fork, etc.), dowels, skewers, or chopsticks that you’ll find in abundance at Goodwill.
-Acrylic paint
-Brushes
-Craft sealant or protectant
-String
-Wood glue or epoxy
-Clamps
 To get started, cut your wooden tools into slices. Try to create a variety of different shapes and sizes with your cuts. Different tool handles will give you different shapes, so be selective when picking out wooden tools. Use tape to bind skewers together if you intend to cut them on a miter saw (if you cut through the tape it will hold everything together and prevent small pieces from flying out). You could also try your luck with a handsaw – it will just make the process more tedious.
Once you’ve cut enough shapes you will need to sand down any rough edges and drill holes through each piece so that you can string your beads.
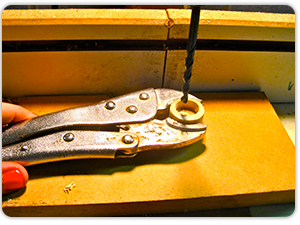
 You will be dealing with small pieces, so it is important to have a way to secure them safely while drilling. I used a clamp to hold each piece while I drilled a hole through the center. Try using several different drill bits to make different sized holes so that you have more options when assembling.
 |
| Sliced chopstick inside dowel piece. |
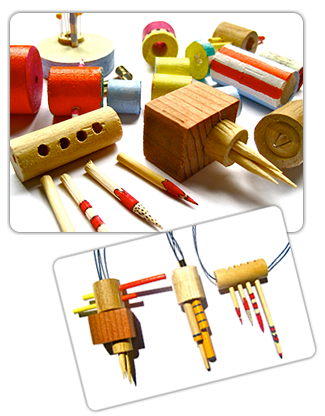
Once you have finished sanding and drilling, use acrylic paint to paint your pieces with bright colors. You can use a Sharpie® to make finer lines. Once dry, cover with a layer of craft varnish or craft protectant to make the beads more durable.
 Now, assemble your jewelry. You can put skewers through dowels for an architectural look and use epoxy or wood glue to secure. Experimentation is the key to making interesting pieces. The more parts you make to begin with, the more combinations you can try, and the more likely you are to have success.
Make many bright colored strands and share them with your friends!


