Be sure to read Bjorn's weekly column for great advice. If you have specific questions send him an email at
 I love to find unique and innovative ways to be creative using items you can easily find at Goodwill by turning them into fashionable accessories. This week, in our continuing series on re-purposing, I wanted to pay homage to the humble and versatile men’s necktie. Have you ever checked out the rack at the Goodwill near you? If so, then you know that neckties ($1.49) are often made of beautiful silks and satins. In addition, they’re often designed with colorful and interesting patterns. I saw this idea for a fabric wristlet at a craft show and decided to put my own spin on it utilizing neckties. It’s quite easy to do and fun to experiment with. Plus, these fabric bracelets can give any outfit a little bit of menswear pizzazz.
All you’ll need is a necktie whose pattern you like, an empty yogurt container (another item to re-use), a few small pieces self-stick Velcro, and a variety of buttons, old earrings, or pins.
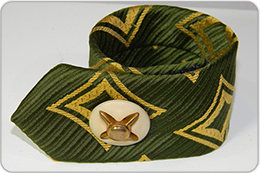
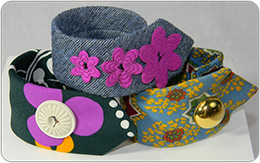
First, cut the smaller end of the tie to around 9 inches. This will be your wristlet.
Next, carefully cut around the yogurt container so that you end up with a band that is around 1 inch (or a little more depending on the width of your tie) wide. Be careful, as the edges may be sharp. This will provide the requisite stability and also give your wristlet a bracelet shape. Insert the yogurt container band into the raw end of the tie you’ve just cut off.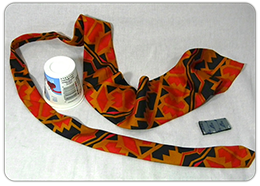
Try it on your wrist and adjust the length so that the point overlaps over the raw edge. Trim if necessary and turn the raw edge of the fabric inside the tie piece and stitch closed to give it a finished look. You could also use a hot glue or iron on hem tape if you’d like.
Cut some small pieces of the Velcro and position them to the length and fit you’d like your wristlet to have. Make sure there’s enough room for adjustment of the Velcro to accommodate wearing it solo or paired with other bracelets. Securely attach the Velcro in place. You may also sew snaps on if you wish. Larger ones will work better, but you could also use a couple of smaller ones too.
Now, it’s up to you to create your embellishment. My mother Audrey, who is 85 years old made the wristlets I’ve pictured here. Simply sew on the pointed end wherever you think it looks good. You could even sew on two or three depending on your mood and the look you’re going for. She enjoyed finding just the right buttons to compliment the patterns and textures of the ties and had a wonderful time putting these together as they only take a half an hour or so to make.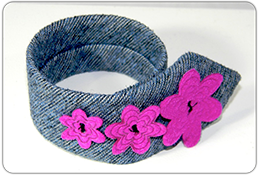
This is such a simple and stylish craft that anyone can do! So next time your husband or father is going to throw out a tie that he’s gotten a stain on, tell him to wait. The part of the tie that we use for this project is never where a stain from spillage is likely to happen. Or, head to the Goodwill Store in your neighborhood to get your supplies, and you too can come up with a one of a kind accessory for yourself or someone you know. Have fun, and keep on finding new ways to recycle. After all it’s not just a saying, but a way of finding the beauty and purpose in everything around us!